

When it comes to baking, the Chocolate Dora Cake stands out as a simple yet indulgent treat. With its rich cocoa flavor and creamy frosting, this cake is perfect for any celebration or casual gathering. You'll appreciate the ease of preparation, allowing you to focus on creating sweet memories. But what makes this recipe even more versatile are the various substitution and decorating options you'll discover. Let's explore how to make this delightful cake truly your own.
Recipe Tips and Tricks
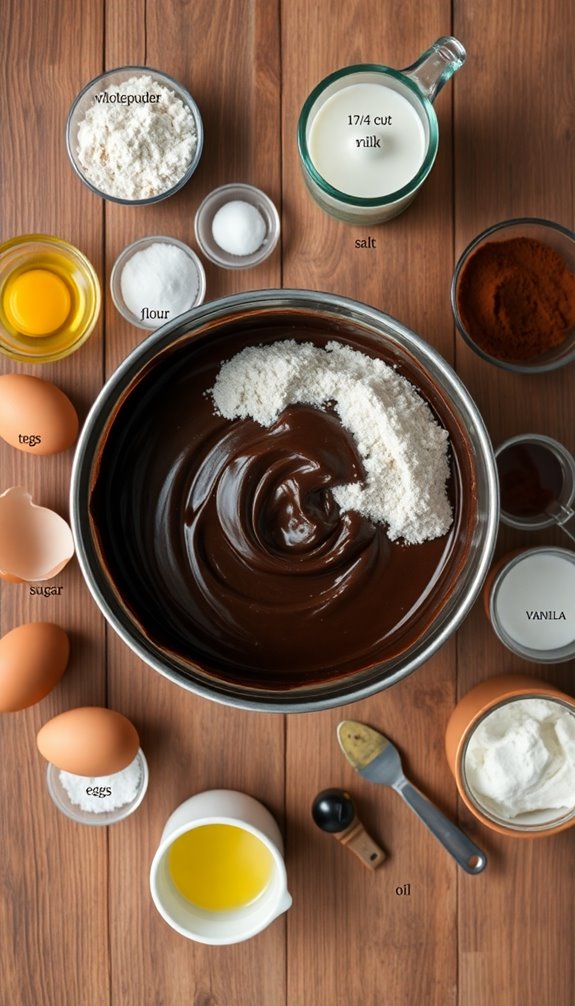
- Use 1 ¾ cups all-purpose flour, 1 ½ cups sugar, and ¾ cup cocoa powder for the cake base.
- Mix ingredients and bake at 350°F (175°C) for 30-35 minutes in greased pans.
- For frosting, combine 1 cup heavy cream, 2 cups powdered sugar, and ½ cup cocoa powder.
- Decorate with chocolate ganache, sprinkles, or fresh berries to enhance presentation.
- Serve with vanilla ice cream or coffee for an elevated dessert experience.
How To Make It – Recipe
To create a delectable Chocolate Dora Cake, you'll need to gather some common baking ingredients and set aside a bit of time for preparation and baking. This cake is a delightful treat that combines rich chocolate flavors with a moist, tender crumb. Perfect for birthdays, celebrations, or simply as a sweet indulgence, the Chocolate Dora Cake is sure to impress family and friends alike.
With its beautiful layers and creamy frosting, it's not just a dessert but a centerpiece that everyone will love. Before you begin, make sure your ingredients are at room temperature for ideal mixing. The process involves creating a flavorful chocolate batter, baking it to perfection, and then layering it with a creamy frosting that complements the cake's rich texture.
Once you master this recipe, you'll find that it's not only easy to make but also incredibly rewarding when you take that first bite of chocolaty goodness. Additionally, this Dora Cake recipe allows for customization with various flavors and fillings, making it a versatile choice for any occasion.
Ingredients:
- 1 ¾ cups all-purpose flour
- 1 ½ cups granulated sugar
- ¾ cup unsweetened cocoa powder
- 1 ½ teaspoons baking powder
- 1 ½ teaspoons baking soda
- 1 teaspoon salt
- 2 large eggs
- 1 cup whole milk
- ½ cup vegetable oil
- 2 teaspoons vanilla extract
- 1 cup boiling water
- 1 cup heavy cream (for frosting)
- 2 cups powdered sugar (for frosting)
- ½ cup unsweetened cocoa powder (for frosting)
To prepare the Chocolate Dora Cake, preheat your oven to 350°F (175°C). Grease and flour two 9-inch round cake pans. In a large mixing bowl, combine the flour, sugar, cocoa powder, baking powder, baking soda, and salt. Mix well, then add the eggs, milk, oil, and vanilla extract. Beat on medium speed for about 2 minutes until the mixture is smooth.
Carefully stir in the boiling water; the batter will be thin. Pour the batter evenly into the prepared pans and bake for 30-35 minutes, or until a toothpick inserted into the center comes out clean. Allow the cakes to cool in the pans for 10 minutes before transferring them to wire racks to cool completely.
For some extra tips, make sure to sift your cocoa powder to avoid clumps, and consider adding chocolate chips to the batter for added texture and flavor. If you want a richer frosting, you can use dark chocolate instead of cocoa powder for the frosting.
Additionally, to keep your layers moist, brush them lightly with a simple syrup made of equal parts sugar and water before frosting. Enjoy your baking experience!
Substitution Suggestions
Baking is a creative process, and sometimes you might find yourself without certain ingredients for the Chocolate Dora Cake.
If gluten's an issue, you can use almond flour or coconut flour as gluten alternatives, ensuring a deliciously moist texture.
For dairy substitutes, try almond milk or coconut cream in place of traditional milk, and opt for vegan butter or applesauce instead of regular butter.
These substitutions won't compromise flavor, allowing you to whip up a delightful cake that meets your dietary needs. Additionally, using gluten-free flours can enhance the cake's texture and flavor profile.
Embrace these swaps, and enjoy the baking adventure as you create a scrumptious Chocolate Dora Cake!
Decorating Ideas
A few creative decorating ideas can transform your Chocolate Dora Cake into a stunning centerpiece.
Start with smooth, rich chocolate ganache for a glossy finish, using simple frosting techniques to create swirls or peaks.
For cake toppings, consider colorful sprinkles or edible glitter to add a playful touch. Fresh berries or mini chocolate chips can enhance visual appeal while providing delightful flavors.
You could even mold chocolate or fondant into Dora-themed shapes for a personal touch. Additionally, incorporating cream cheese dirt cake elements can add a unique twist to the overall flavor profile.
Finally, don't forget to use a vibrant cake stand to elevate your creation, making it the star of any celebration.
Enjoy decorating!
Serving Suggestions
While you might be tempted to simply slice your Chocolate Dora Cake and serve it on a plate, there are plenty of ways to elevate the experience.
Consider serving it warm, drizzled with a rich chocolate sauce for indulgence. Pair it with a scoop of creamy vanilla ice cream for a delightful contrast in flavors. Fresh berries add a burst of color and freshness, making your dessert even more appealing.
For a touch of sophistication, dust the cake with powdered sugar or serve it alongside a cup of freshly brewed coffee. Additionally, serving it with a deliciously simple funnel cake can create a fun and festive atmosphere.
These serving suggestions will truly enhance your dessert pairings!
Make-Ahead and Storage
If you're planning to serve your Chocolate Dora Cake for a special occasion, making it ahead of time can relieve some of the stress on the big day.
To save time, bake the cake up to two days in advance. Allow it to cool completely, then wrap it tightly in plastic wrap. For best freshness, consider using airtight storage containers to keep it moist.
You can also prepare the frosting a day ahead and store it in the fridge. Just give it a quick whip before spreading. Delicious Oreo Dora Cake is a great option for an impressive dessert.
With these make-ahead tips, you'll be ready to impress your guests effortlessly!
How to Store Leftovers
Leftover Chocolate Dora Cake can be just as delightful as when it was freshly baked, but proper storage is key to preserving its rich flavor and moist texture.
For effective leftover storage, wrap individual slices in plastic wrap or aluminum foil to prevent drying out. You can also place the entire cake in an airtight container.
Store it in the refrigerator for up to a week, or freeze it for longer cake preservation. Remember that eggless cakes tend to retain moisture well, making them ideal for storage.
When you're ready to enjoy a slice, simply let it come to room temperature, and you'll be greeted with that same delectable taste you love!
Nutrition Facts(per serving)
Enjoying Chocolate Dora Cake isn't just about the indulgent flavors; it's also important to contemplate the nutrition behind each slice.
Each serving typically carries about 350 calories, offering a delightful balance between richness and satisfaction. The ingredient breakdown reveals a mix of flour, cocoa powder, sugar, and eggs, which contribute to both the taste and texture.
While it's a treat, you'll also find a dose of essential nutrients from the eggs and a bit of fiber from the cocoa. Additionally, incorporating whole grains in desserts can enhance the nutritional profile of baked goods like cakes.
Final Thoughts
As you reflect on the experience of baking and sharing Chocolate Dora Cake, it's clear that this delightful dessert brings more than just sweetness to the table.
The rich, moist layers offer endless chocolate variations, allowing you to experiment with flavors like dark chocolate or mocha. Whether you serve it with a scoop of vanilla ice cream or a dollop of whipped cream, the cake pairings elevate every bite.
This cake isn't just a treat; it's a celebration of creativity and connection. So, gather your loved ones, relish in the joy of baking, and create lasting memories together with this irresistible dessert. Plus, like the honeybun cake, it can be made effortlessly for any occasion.
Recipe FAQs
Can I Use Dark Chocolate Instead of Milk Chocolate?
Yes, you can use dark chocolate instead of milk chocolate! Dark chocolate offers health benefits and a richer flavor, enhancing your dessert. Just keep in mind the flavor differences—it'll be less sweet and more intense!
How Long Does the Cake Take to Bake?
You'll want to keep an eye on the clock. The cake bakes for about 25 to 30 minutes. Perfect baking time guarantees a moist texture, so check it with a toothpick for that perfect finish!
What Tools Do I Need to Make This Cake?
To make this cake, you'll need essential baking tools like mixing bowls, measuring cups, and a whisk. Don't forget cake decorating supplies such as icing spatulas and piping bags to create a beautiful finish!
Is This Recipe Suitable for Gluten-Free Diets?
Yes, this recipe can be suitable for gluten-free diets. You'll want to substitute regular cake flour with gluten alternatives like almond flour or coconut flour, ensuring a deliciously moist and flavorful cake that everyone can enjoy!
Can I Freeze the Cake After Baking?
Yes, you can freeze the cake after baking! For best results, use proper storage methods like plastic wrap and airtight containers. Follow these freezing tips to guarantee your cake stays fresh and delicious when you're ready to enjoy it!


