If you're looking for a dessert that impresses without requiring extensive baking skills, the Oreo Crust Cheesecake is an excellent choice. Its creamy filling pairs perfectly with the crunch of crushed Oreos, creating a delightful contrast. Plus, it's versatile enough to customize with toppings. Whether you're hosting a gathering or simply treating yourself, this cheesecake is sure to satisfy. Ready to explore how to make this indulgent dessert?
Recipe Tips and Tricks
- Crush 24 Oreo cookies and mix with 1/4 cup melted butter to form the crust in a springform pan.
- Prepare cheesecake filling by beating 16 oz softened cream cheese, then adding 1 cup sugar and 1 teaspoon vanilla extract.
- Incorporate eggs one at a time, then stir in sour cream and heavy cream until the mixture is smooth.
- Bake at 325°F for 50-60 minutes until the center is set slightly jiggly, then cool in the oven for an hour.
- Chill in the fridge for at least 4 hours before serving, optionally garnished with chocolate sauce or fresh berries.
How To Make It – Recipe
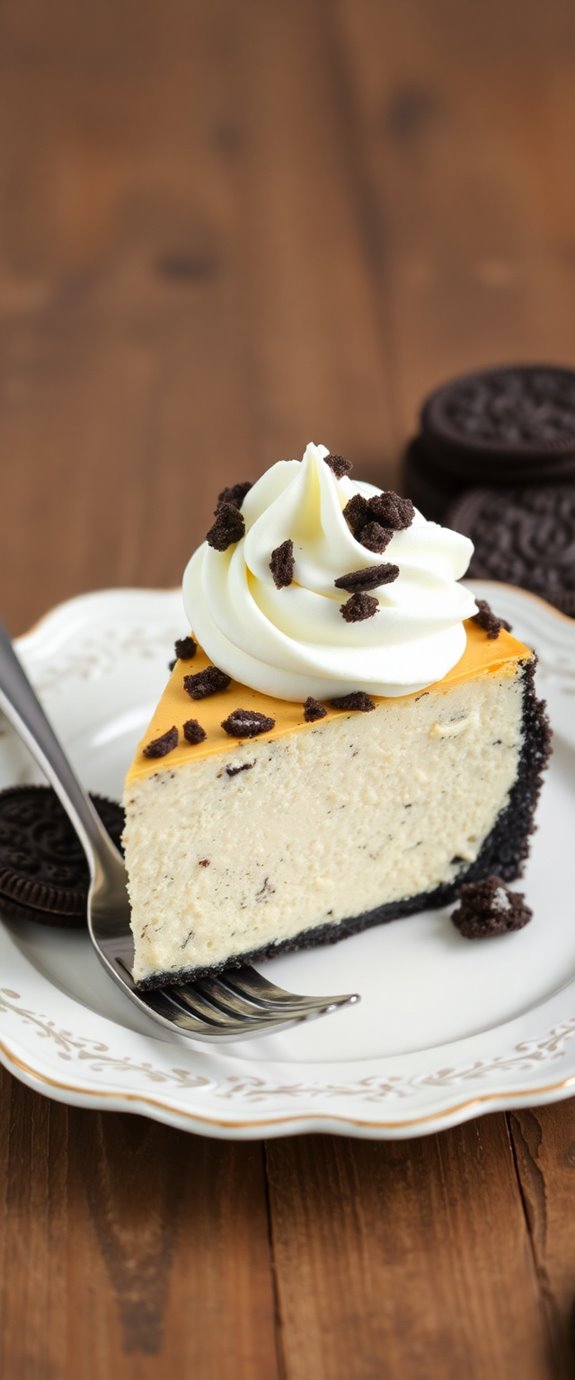
The Oreo crust cheesecake is a delightful dessert that combines the rich, creamy texture of cheesecake with the crunchy, chocolaty goodness of Oreo cookies. This indulgent treat is perfect for any occasion, whether it's a birthday celebration, a holiday gathering, or just a sweet conclusion to a cozy dinner.
With its easy preparation, this cheesecake will impress your guests and satisfy your sweet tooth. Crafting an Oreo crust cheesecake is a straightforward process that requires minimal ingredients and time. The combination of crushed Oreo cookies and melted butter creates a delectable crust, while the creamy cheesecake filling is made with cream cheese, sugar, and vanilla. Additionally, the rich, creamy texture of the cheesecake can be enhanced by using high-quality cream cheese.
Once baked and chilled, this dessert is ready to be served, offering a perfect balance of flavors and textures.
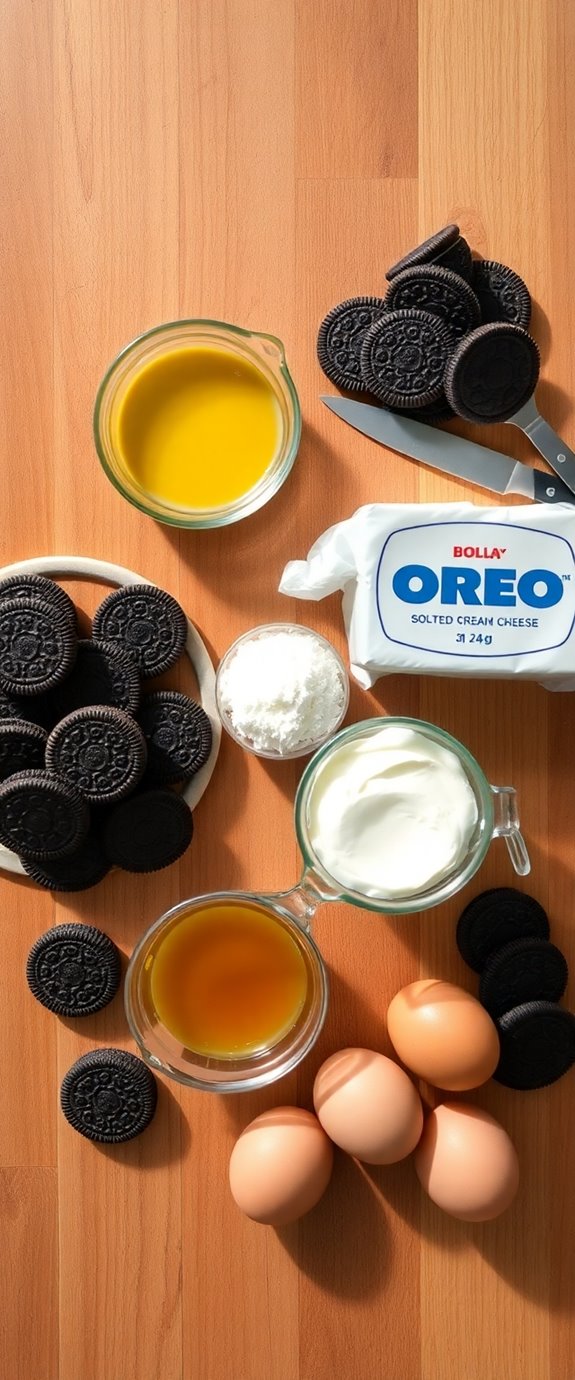
Ingredients:
- 24 Oreo cookies
- 1/4 cup unsalted butter, melted
- 16 oz cream cheese, softened
- 1 cup granulated sugar
- 1 teaspoon vanilla extract
- 3 large eggs
- 1/2 cup sour cream
- 1/4 cup heavy cream
To make the cheesecake, start by preheating your oven to 325°F (160°C). In a food processor, crush the Oreo cookies until fine crumbs form. Mix the crumbs with the melted butter until well combined, then press the mixture firmly into the bottom of a 9-inch springform pan to create the crust.
In a large bowl, beat the cream cheese until smooth, then gradually add the sugar and vanilla extract. Mix in the eggs one at a time, ensuring each is fully incorporated before adding the next. Finally, stir in the sour cream and heavy cream until the filling is smooth.
Pour the cheesecake mixture over the prepared crust and bake for about 50-60 minutes, or until the center is set but still slightly jiggly. Turn off the oven and let the cheesecake cool inside for an hour before transferring it to the fridge to chill for at least 4 hours or overnight.
When making an Oreo crust cheesecake, it's important to allow the cheesecake to cool gradually to prevent cracks on the surface. If you want a smoother top, consider running a spatula around the edge of the pan after baking, which can help release the cheesecake from the sides.
For added flavor, you can also mix crushed Oreos into the cheesecake filling or top it with whipped cream and additional Oreo pieces before serving. Enjoy your delicious homemade cheesecake!
Substitution Suggestions
If you're looking to switch things up or accommodate dietary preferences, there are plenty of substitution options for your Oreo crust cheesecake.
Consider using chocolate graham crackers or crushed nuts as Oreo alternatives for a different texture and taste. For gluten-free options, opt for gluten-free cookies or almond flour to create a delicious crust.
You can also experiment with flavor variations by adding cocoa powder or flavored cookies, like mint or peanut butter.
If you're feeling adventurous, try crust alternatives like a cookie dough crust or a simple shortbread base.
Each option adds a unique twist to your cheesecake masterpiece! Additionally, for a truly indulgent experience, consider incorporating decadent Biscoff flavors into your cheesecake for an extraordinary flavor combination.
Decorating Ideas
While you might think the deliciousness of your Oreo crust cheesecake speaks for itself, adding some creative decorations can elevate its presentation and flavor.
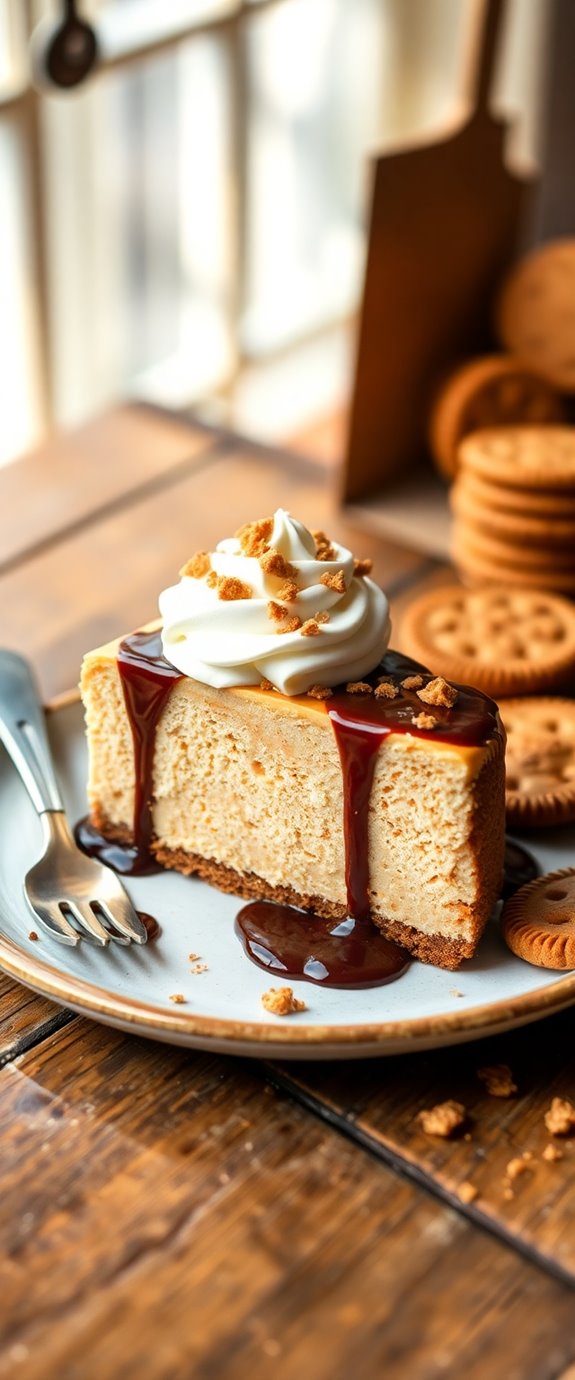
Start with a drizzle of chocolate or caramel sauce for a tempting touch. For Oreo decoration, crush extra cookies and sprinkle them over the top, or use whole cookies for an eye-catching border.
Fresh berries add a pop of color and a revitalizing contrast. Whipped cream can be piped on elegantly, making it look indulgent. Additionally, incorporating decadent cheesecake toppings like toffee bits or sprinkles to delight your guests, turning a simple dessert into a stunning masterpiece.
Serving Suggestions
When you're ready to serve your Oreo crust cheesecake, consider pairing it with complementary flavors that enhance the overall experience. A drizzle of rich chocolate sauce or a scoop of vanilla ice cream can elevate each bite.
For garnish options, fresh berries or a sprinkle of crushed Oreos add a pop of color and texture. If you're serving a larger crowd, cut the cheesecake into smaller pieces to create perfect serving sizes, making it easier for everyone to indulge.
Don't forget to offer whipped cream on the side for an extra touch of decadence that's sure to impress your guests! Additionally, pairing your cheesecake with decadent chocolate can create a luxurious flavor profile that chocolate lovers will adore.
Make-Ahead and Storage
To guarantee your Oreo crust cheesecake is ready for any occasion, you can easily make it ahead of time and store it properly. Use these make-ahead tips: prepare your cheesecake a day or two in advance, allowing the flavors to meld beautifully.
Once it's set, place it in airtight storage containers to keep it fresh. If you're planning to freeze it, wrap it tightly with plastic wrap before using a storage container for extra protection. This way, you can enjoy your delightful dessert anytime without sacrificing quality. Just remember to thaw it in the fridge before serving! Additionally, no bake cheesecakes are especially forgiving when it comes to preparing them ahead of time, ensuring you have a stress-free experience.
How to Store Leftovers
If you've got leftover Oreo crust cheesecake, you'll want to store it properly to maintain its deliciousness.
To start, cover the cheesecake tightly with plastic wrap or aluminum foil. This will help prevent drying out and absorbing any odors from the fridge.
For longer storage, consider cheesecake freezing tips: slice the cheesecake into portions, wrap each slice in plastic, and then place them in a freezer-safe container. This way, you can enjoy a piece whenever the craving strikes! Additionally, no-bake cheesecakes can last up to three months in the freezer if stored correctly.
Nutrition Facts(per serving)
Each serving typically contains around 350 calories, making it a delightful treat. The caloric content comes from a rich blend of cream cheese, sugar, and, of course, those delectable Oreos. Additionally, you can elevate your dessert experience by pairing it with Creamy Reese's Cheesecake Delight, which adds a unique twist to traditional cheesecake flavors.
With regard to nutrient breakdown, you'll find about 20 grams of fat, 40 grams of carbs, and 5 grams of protein. While it's a sweet indulgence, being aware of these figures helps you enjoy your dessert responsibly without sacrificing flavor or satisfaction.
Enjoy every creamy bite!
Final Thoughts
As you savor each bite of your Oreo crust cheesecake, it's easy to see why this dessert has become a favorite among many. The rich, creamy filling perfectly complements the crunchy, chocolatey crust, creating a delightful contrast in each mouthful.
Don't hesitate to explore cheesecake variations, like adding fruits or flavored extracts, to customize your dessert. If you're feeling adventurous, consider crust alternatives such as graham crackers or nut-based crusts for different textures and flavors. A classic option is the Philadelphia Cheesecake recipe, which is known for its smooth and creamy texture.
Whatever path you choose, this cheesecake will surely impress your guests and satisfy your sweet cravings. Enjoy every delicious moment!
Recipe FAQs
Can I Use Gluten-Free Oreos for the Crust?
Absolutely, you can use gluten-free Oreos for the crust! They'll provide a delicious alternative, maintaining a similar crust texture that everyone will love. Just crush them up and enjoy your tasty treat without gluten worries!
How Long Does the Cheesecake Need to Cool Before Serving?
After baking, you should let the cheesecake cool for at least two hours at room temperature before refrigerating it. This cooling time helps achieve the perfect serving temperature, ensuring a deliciously creamy texture when you slice in.
Can I Freeze the Cheesecake for Later Use?
You can freeze your cheesecake for later enjoyment. Just follow these freezing tips: wrap it tightly, and when you're ready, use proper thawing methods like refrigerating overnight for the best texture and flavor. Enjoy!
What Is the Best Way to Slice a Cheesecake?
To achieve perfect slices when cheesecake slicing, use a hot, sharp knife. Dip it in hot water, wipe it dry, then slice through your cheesecake. This method prevents sticking and guarantees clean, beautiful portions every time.
Can I Add Other Flavors to the Cheesecake Filling?
You can definitely explore flavor variations and try ingredient substitutions! Think vanilla bean for richness, lemon zest for brightness, or chocolate for indulgence. Each addition transforms your cheesecake, making it uniquely yours and delightfully delicious.