
If you're looking for a fun twist on a classic dessert, cheesecake on a stick might just be what you need. This creamy, indulgent treat combines the rich flavor of cheesecake with the playful convenience of a popsicle. It's not only easy to prepare but also customizable with various toppings. Curious about the recipe and how to elevate your presentation? Let's explore the steps to create this delightful dessert.
Recipe Tips and Tricks
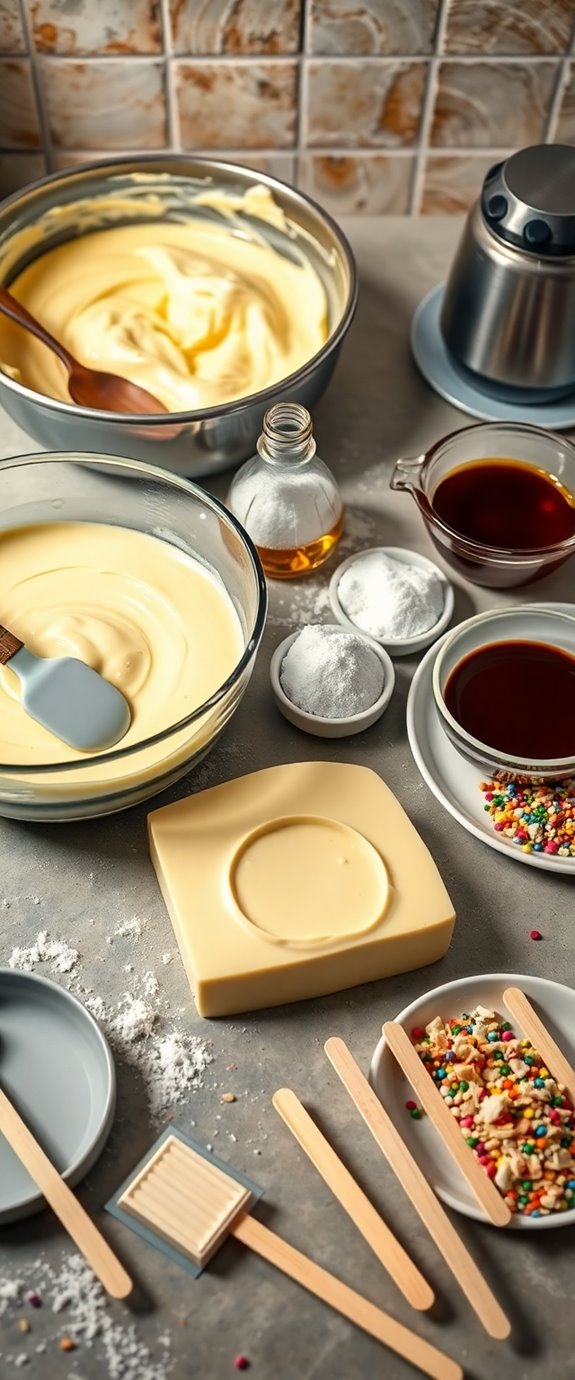
- Combine softened cream cheese, sugar, vanilla, eggs, and sour cream for the cheesecake batter before baking at 325°F for 30-35 minutes.
- Cool the cheesecake completely, then freeze for at least 4 hours until firm before cutting into bars and inserting popsicle sticks.
- Melt chocolate chips for dipping, then coat each cheesecake bar and add desired toppings like nuts, sprinkles, or coconut flakes.
- Store leftovers in airtight containers or freeze individually wrapped for later enjoyment, thawing in the refrigerator before serving.
- Serve with dipping sauces like chocolate or caramel for a fun interactive dessert experience at parties or gatherings.
How To Make It – Recipe
To make cheesecake on a stick, you'll need to start with a delicious cheesecake base that you can freeze and then dip in chocolate for a tasty treat. This fun and innovative dessert is perfect for parties, picnics, or just a sweet indulgence at home. The key to getting that perfect creamy texture is to use room temperature cream cheese, which will blend smoothly with the other ingredients, guaranteeing a delightful cheesecake experience on a stick.
Once you've created your cheesecake mixture, you'll pour it into a pan and allow it to set in the freezer. After it's firm enough, you can cut it into bars and insert sticks for easy handling. The chocolate coating adds an extra layer of flavor and can be customized with toppings like crushed nuts, sprinkles, or coconut flakes. This recipe isn't only delicious but also easy to make, and it's sure to impress your guests!
Ingredients:
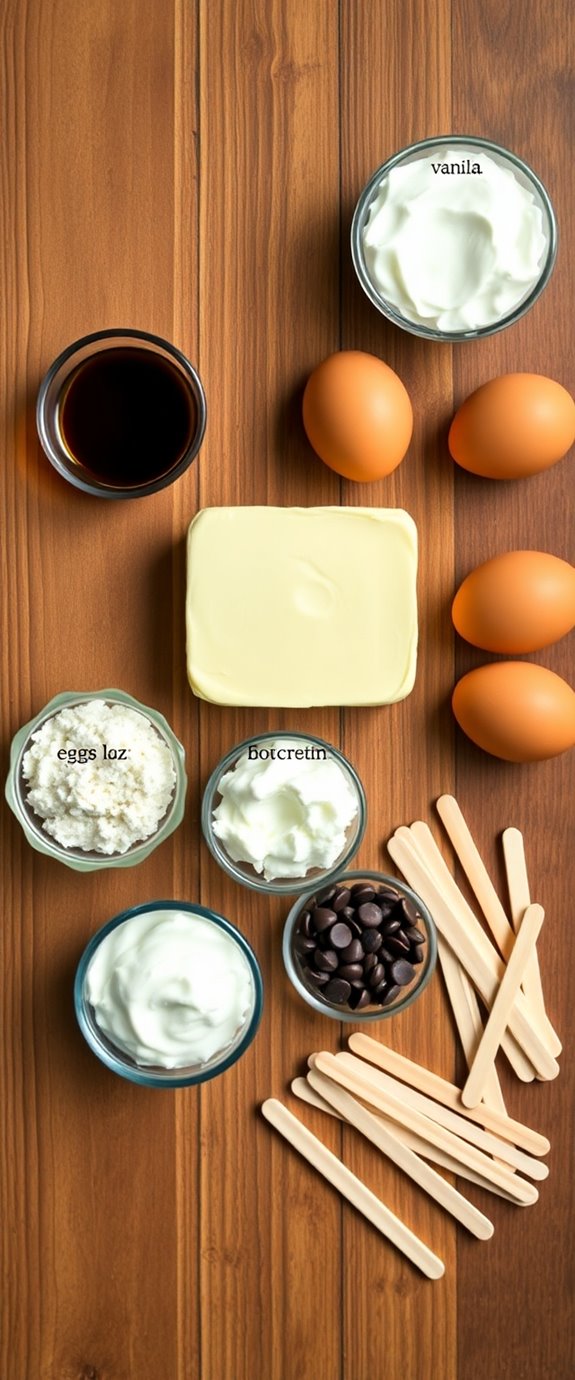
- 16 oz cream cheese, softened
- 1 cup granulated sugar
- 1 teaspoon vanilla extract
- 2 large eggs
- 1 cup sour cream
- 8 oz chocolate chips (for dipping)
- Wooden popsicle sticks
- Optional toppings (e.g., crushed nuts, sprinkles, coconut flakes)
To prepare the cheesecake on a stick, begin by preheating your oven to 325°F (160°C) and greasing a 9×9-inch baking pan. In a large mixing bowl, beat the softened cream cheese until smooth.
Add the sugar and vanilla extract, mixing until combined. Next, add the eggs one at a time, beating well after each addition. Finally, stir in the sour cream until the mixture is fully blended.
Pour the cheesecake batter into the prepared pan and bake for about 30-35 minutes, or until the center is set. Allow it to cool completely before placing in the freezer for at least 4 hours or until firm.
Once frozen, cut the cheesecake into bars, insert the popsicle sticks, and dip in melted chocolate. Allow the chocolate to set before serving.
When making cheesecake on a stick, be certain to let the cheesecake cool completely before freezing; this will prevent ice crystals from forming and guarantee a smooth texture. Additionally, you can experiment with different flavorings in your cheesecake batter, such as lemon zest or cocoa powder, to create variations. If you want to make the chocolate coating a bit healthier, consider using dark chocolate or a sugar-free version.
This decadent dessert is reminiscent of Philadelphia cheesecake, which adds a rich and creamy flavor profile that is truly irresistible.
Enjoy your delicious and fun cheesecake on a stick!
Substitution Suggestions
When it comes to making cheesecake on a stick, there are plenty of creative substitutions you can try to tailor the dessert to your taste or dietary needs.
For a lighter option, consider using cream cheese alternatives like Greek yogurt or ricotta cheese, which can add a unique flavor while reducing fat content.
If you're looking for gluten-free crusts, crushed nuts or gluten-free graham crackers work beautifully, providing a delightful crunch.
You can also experiment with sweeteners, swapping sugar for honey or maple syrup, making this treat even more personalized.
Additionally, dairy-free alternatives can provide a rich and creamy texture without compromising on taste, allowing everyone to enjoy this delicious dessert.
Your cheesecake on a stick can be as unique as you are!
Decorating Ideas
Now that you've crafted a delicious cheesecake on a stick, it's time to elevate its appearance with some fun decorating ideas.
Start by drizzling melted chocolate over your cheesecake for a rich finish. You can also dip the tops in creamy caramel or vibrant fruit sauces.
Enhance the look with various cheesecake toppings like crushed nuts or cookie crumbs for texture. Don't forget to sprinkle on some festive sprinkles to add a pop of color—perfect for any celebration! For an extra touch of flavor, consider adding an Oreo cheesecake layer to your creation, which will bring an indulgent twist to your dessert.
These simple touches will make your cheesecake on a stick not only tasty but visually exciting too. Enjoy your creative masterpiece!
Serving Suggestions
Cheesecake on a stick makes for a delightful treat that's perfect for any gathering or celebration. You can showcase a variety of cheesecake flavors—like classic vanilla, rich chocolate, or fruity strawberry—on a beautiful dessert table.
For a stunning stick presentation, arrange the cheesecake pops in a tall glass or a decorative bucket filled with colorful candies or sprinkles. This not only adds flair but also keeps them upright for easy grabbing.
Pair them with dipping sauces like chocolate or caramel to elevate the experience. Your guests will love mixing and matching flavors for a fun, interactive dessert! To create a truly unforgettable dessert, consider using Delicious No-Bake Cheesecake as a base for your cheesecake pops.
Make-Ahead and Storage
If you're planning a party or special event, making cheesecake on a stick ahead of time can save you a lot of stress.
Use these make-ahead tips: prepare the cheesecake mixture and pour it into molds a day in advance.
Once frozen, you can pop them out and store them in airtight storage containers. This keeps them fresh and easy to grab when you need them.
Just remember to label your containers with the date, so you know how long they've been stored. No-bake cheesecake is a perfect option for this method since it sets well in the freezer.
Your guests will appreciate having this delicious treat ready to go, giving you more time to enjoy the occasion!
How to Store Leftovers
After indulging in the sweet delight of cheesecake on a stick, you might find yourself with some delicious leftovers.
To guarantee they stay fresh, proper leftover storage is key. Start by wrapping each cheesecake stick individually in plastic wrap, sealing in the flavors.
Then, place them in an airtight container or a freezer bag. For longer-lasting treats, use freezing techniques—label the bag with the date and pop it in the freezer. No bake cheesecake is a great option for easy preparation and delicious taste!
When you're ready to enjoy them again, simply thaw in the refrigerator for a few hours. This way, you can savor the sweetness all over again!
Nutrition Facts(per serving)
Delicious treats like cheesecake on a stick can be enjoyed without guilt when you know the nutrition facts.
Each serving typically contains around 200 calories, making it a delightful indulgence that won't derail your diet. You'll also find the sugar levels hovering around 10 grams, offering just the right amount of sweetness.
This balance allows you to savor the creamy goodness without overloading on sugar. Plus, with a rich blend of cream cheese and graham cracker crust, you're treating yourself to a dessert that satisfies your cravings while keeping your caloric content in check. Additionally, this sugar free cheesecake option provides a healthier alternative for those watching their sugar intake.
Enjoy every bite with confidence!
Final Thoughts
While treating yourself to cheesecake on a stick, you can indulge in a delightful dessert that strikes the perfect balance between taste and nutrition.
These satisfying desserts aren't only easy to make but also offer a fun twist on a classic favorite. Imagine savoring a creamy cheesecake layer, perfectly coated in chocolate, then shared among friends at your next gathering.
They're great for parties or simply as a treat for yourself. So go ahead, whip up these fun treats, and relish every bite.
You'll find that cheesecake on a stick isn't just a dessert; it's a delightful experience! Additionally, you can enhance the flavor with a delicious no-bake cheesecake filling that makes preparation a breeze.
Recipe FAQs
Can I Use Non-Dairy Cream Cheese for This Recipe?
Absolutely, you can use non-dairy cream cheese for this recipe! It works well as a substitute, providing a creamy texture. Plus, it's a great option for those seeking vegan alternatives without sacrificing flavor. Enjoy experimenting!
How Do I Prevent Cheesecake From Cracking on a Stick?
To prevent cracking, guarantee your cheesecake texture is smooth and well-mixed. Use a water bath for stick stability during baking, and avoid sudden temperature changes. Chill thoroughly before inserting sticks for best results.
What Types of Sticks Work Best for Cheesecake on a Stick?
Did you know 70% of people prefer visually appealing desserts? For cheesecake on a stick, wooden skewers work best. They're sturdy, enhance dessert presentation, and guarantee your cheesecake stays intact while enjoying this delicious treat.
Can I Freeze Cheesecake on a Stick?
Yes, you can freeze cheesecake on a stick! Use airtight containers or wrap them individually. For best results, label with freezing tips and storage methods, ensuring they maintain their delicious flavor and creamy texture once thawed.
What Flavors Can I Add to the Cheesecake Mixture?
You can enhance your cheesecake mixture by adding vanilla extract for richness, chocolate chips for sweetness, or even fruit purees for a revitalizing twist. Experiment with flavors like caramel or coffee to create your perfect dessert!


