

Did you know that red velvet cake has roots dating back to the 1920s, originally gaining fame in upscale restaurants? This Red Velvet Cheesecake Trifle takes that classic flavor to new heights, combining the moist richness of cake with the creamy texture of cheesecake. As you explore the layers and possibilities of this indulgent dessert, you'll discover how easy it is to impress your guests or treat yourself to a special occasion.
Recipe Tips and Tricks
- Layer moist red velvet cake cubes with rich cheesecake filling made from cream cheese, powdered sugar, and vanilla extract.
- Alternate layers of cake, cheesecake filling, and crushed cake in a trifle dish, finishing with whipped cream.
- Prepare your dessert in advance for enhanced flavors; it can be made a day or two prior to serving.
- Customize the recipe for dietary needs by using gluten-free cake mix or dairy-free alternatives like Greek yogurt and coconut cream.
- Decorate with whipped cream, chocolate shavings, or fresh fruit for an elegant presentation suitable for any occasion.
How To Make It – Recipe
To create a delightful Red Velvet Cheesecake Trifle, you'll begin by layering rich and creamy cheesecake filling with moist red velvet cake and fluffy whipped cream. This luscious dessert not only looks stunning but also combines the classic flavors of red velvet and cream cheese, making it a perfect treat for celebrations or simply to satisfy your sweet tooth.
The layered presentation in a trifle dish makes it visually appealing, allowing the vibrant red and white colors to shine through. This recipe is versatile; you can prepare it ahead of time for a gathering or serve it immediately for a spontaneous dessert. The key to a successful trifle is allowing the layers to meld together, giving you a burst of flavor with each spoonful.
Make certain to use high-quality ingredients, particularly for the cream cheese and whipped cream, to guarantee a rich and satisfying taste that complements the red velvet cake beautifully. **Using high-quality ingredients is essential for achieving the best flavor and texture.**
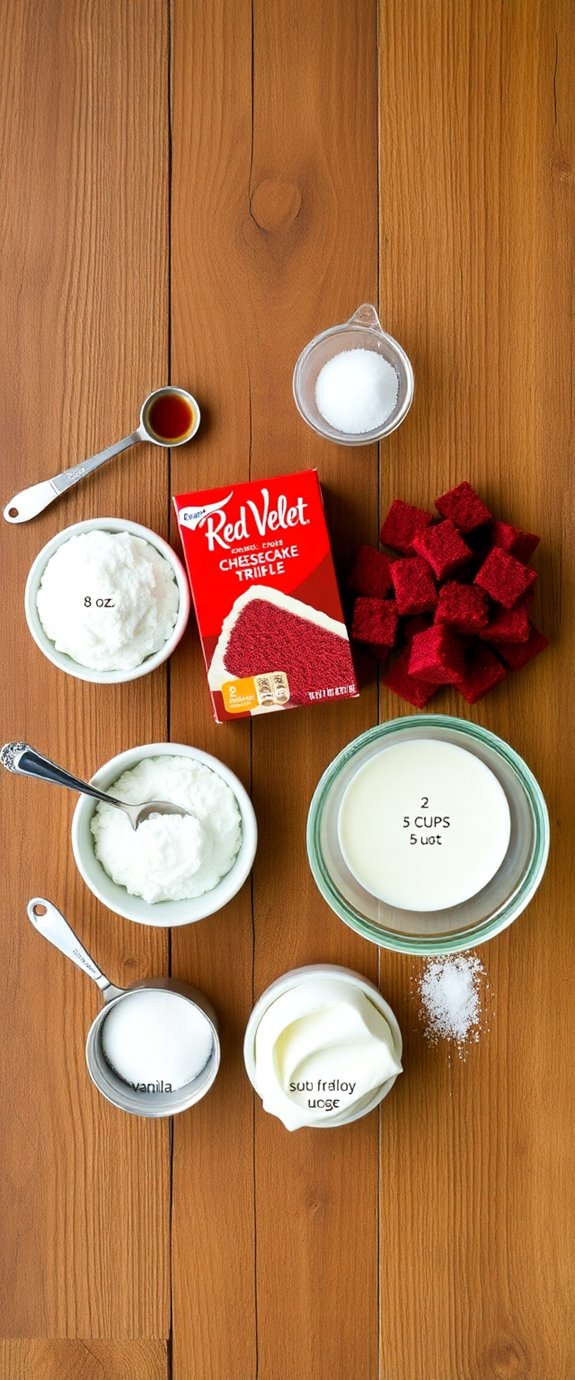
Ingredients:
- 1 box red velvet cake mix (plus ingredients required on the box)
- 8 oz cream cheese, softened
- 1 cup powdered sugar
- 1 tsp vanilla extract
- 2 cups heavy whipping cream
- 1/2 cup granulated sugar
- 1 cup crushed red velvet cake (from the baked cake)
- 1/2 cup chocolate shavings or sprinkles (optional, for garnish)
To cook this delightful trifle, start by baking the red velvet cake according to the package instructions. Once baked, allow the cake to cool completely before cutting it into cubes.
In a separate bowl, beat the softened cream cheese until smooth, then add the powdered sugar and vanilla extract, mixing until well combined. In another bowl, whip the heavy cream and granulated sugar until stiff peaks form. Gently fold the whipped cream into the cream cheese mixture until fully incorporated.
Now it's time to layer: in a trifle dish or individual cups, alternate layers of red velvet cake cubes, cheesecake filling, and crushed cake, repeating until you reach the top of your dish. Finish with a layer of whipped cream and sprinkle with chocolate shavings or sprinkles, if desired.
When making this Red Velvet Cheesecake Trifle, remember to chill it in the refrigerator for at least 2 hours before serving to allow the flavors to meld and the cake to soak up some of the cheesecake filling. This dessert can be made a day in advance, making it a great option for parties or potlucks.
Additionally, you can customize the trifle by adding fresh berries or a drizzle of chocolate sauce between the layers for extra flavor and texture. Enjoy this indulgent treat with family and friends!
Substitution Suggestions
When it comes to crafting your Red Velvet Cheesecake Trifle, flexibility is key, allowing you to adapt the recipe to fit your dietary preferences or ingredient availability.
If you're looking for substitution ingredients, consider using gluten-free cake mix for a gluten-free option. For a lighter twist, swap full-fat cream cheese with Greek yogurt.
If you need dairy alternatives, try coconut cream instead of whipped cream, offering a rich, creamy texture. You can also use almond or cashew milk for the cheesecake layer.
Additionally, using a gluten free cheesecake recipe can provide inspiration for creating your trifle layers.
With these dietary alternatives, you'll still enjoy a delicious trifle that suits everyone's needs!
Decorating Ideas
After you've selected your substitutions, it's time to bring your Red Velvet Cheesecake Trifle to life with some eye-catching decorations.
Start by dolloping generous amounts of whipped cream on top, creating a luscious cloud that invites everyone in. Sprinkle chocolate shavings for a rich finish, adding depth to the vibrant layers.
Don't forget to incorporate fresh fruit toppings like strawberries or raspberries for a pop of color and freshness. For a whimsical touch, add edible flowers—think pansies or violets—that not only enhance the visual appeal but also add a hint of elegance. Additionally, consider incorporating Reese's cheesecake flavors to give your trifle a unique twist.
Your trifle will be stunning and delicious!
Serving Suggestions
Serving your Red Velvet Cheesecake Trifle can be just as delightful as making it, especially when you consider a few thoughtful touches.
To elevate your presentation, consider using individual glass cups for a personal touch. You might also explore trifle variations by incorporating layers of fruit or different flavored cakes.
For dessert pairings, serve it alongside a rich coffee or a dollop of whipped cream to enhance the flavors. Adding a layer of Deliciously Creamy Strawberry Cheesecake Delight will provide a refreshing contrast to the richness of the red velvet.
Don't forget to sprinkle some chocolate shavings or crushed cookies on top for an added crunch.
These simple suggestions will make your trifle not just a treat, but a memorable experience!
Make-Ahead and Storage
To guarantee your Red Velvet Cheesecake Trifle stays as delicious as the day it was made, consider making it ahead of time.
The make-ahead benefits are plentiful; flavors meld beautifully, enhancing the taste. Assemble your trifle a day or two before serving, allowing the layers to soak in the creamy goodness. Additionally, you can incorporate no-bake cheesecake techniques to ensure a smooth and creamy texture.
For ideal storage, use an airtight container to keep it fresh. If you're using a glass dish, cover it tightly with plastic wrap.
When you're ready to impress your guests, simply remove it from the fridge, and enjoy the delightful, chilled treat that's ready to wow!
How to Store Leftovers
While enjoying your delicious Red Velvet Cheesecake Trifle, you might find yourself with some tempting leftovers that deserve proper care.
For ideal leftover storage, cover your trifle tightly with plastic wrap or transfer it to an airtight container. This helps maintain the creamy layers and prevents them from drying out.
Store it in the refrigerator, where it'll stay fresh for up to three days. When you're ready to indulge again, simply scoop out a portion, and enjoy the delightful flavors that have melded together. Remember, a no-bake cheesecake is a great alternative if you want a quick and easy dessert option.
With these tips, you'll guarantee perfect trifle preservation for your next sweet treat!
Nutrition Facts(per serving)
Indulging in a Red Velvet Cheesecake Trifle isn't just a treat for your taste buds; it also packs a delightful nutritional profile.
Each serving offers a balance of creaminess and sweetness while providing essential nutrients. You'll find approximately 300 calories, with a good dose of protein from the cream cheese and whipped topping.
The red velvet cake adds carbohydrates for energy, and there's a hint of fiber from any added fruits. This dessert can fit into various dietary plans, so keep an eye on serving sizes to enjoy the nutritional benefits without overindulging. Additionally, you can make a dairy-free cheesecake version to cater to different dietary preferences.
Savor every layer guilt-free!
Final Thoughts
When you treat yourself to a Red Velvet Cheesecake Trifle, you're not just enjoying a delicious dessert; you're also embracing a delightful experience that can elevate any occasion.
This trifle combines the rich flavors of red velvet cake with the creamy texture of cheesecake, making it a standout among festive treats. It's perfect for celebrations or simply to indulge in a sweet moment.
Plus, it's visually stunning, adding a touch of elegance to your table. So, whether you're hosting a gathering or savoring a quiet night in, this trifle is sure to impress and satisfy your dessert cravings. Additionally, indulgent birthday cheesecakes are an excellent way to celebrate special moments with loved ones.
Recipe FAQs
Can I Use a Different Cake Flavor Instead of Red Velvet?
Your dessert can dance with cake flavor alternatives like chocolate or vanilla. Each choice brings unique dessert flavor variations, transforming your creation into a delightful masterpiece that'll tantalize taste buds and spark joy!
How Long Does the Trifle Need to Chill Before Serving?
Chilling time is essential for your trifle's flavors to meld beautifully. Aim for at least four hours, but overnight's even better. For serving suggestions, consider adding fresh berries or whipped cream for a delightful finish!
Is There a Gluten-Free Option for This Recipe?
Like a painter choosing vibrant colors, you can easily swap traditional ingredients for gluten-free alternatives. Use almond flour or gluten-free baking mixes for a deliciously indulgent dessert that everyone can enjoy without compromising flavor or texture.
What Type of Cream Cheese Works Best for the Filling?
When choosing cream cheese for your filling, low fat cream cheese offers a lighter option, while flavored cream cheese can add a delightful twist. Experiment with both to see which best complements your dessert's overall taste!
Can I Make This Trifle in Individual Cups Instead of a Large Dish?
You can definitely make this trifle in individual cups—it's a piece of cake! Just use layering techniques to create beautiful individual servings, ensuring each cup's filled with delightful flavors and textures. Enjoy the presentation!


