There's no dessert quite as heavenly as an Easy No Bake Oreo Cheesecake. Imagine diving into a creamy, dream-like filling that's perfectly balanced with crunchy Oreo bits and a buttery crust. It's indulgence without the fuss of baking, making it ideal for any occasion. Curious about how to whip this up effortlessly and impress your guests? Let's explore the simple steps and tips to create this delightful treat.
Recipe Tips and Tricks
- Use crushed Oreo cookies combined with melted butter for a simple no-bake crust.
- Beat softened cream cheese with sugar and vanilla until smooth for a creamy filling.
- Fold in whipped cream and crushed Oreos for added texture and flavor.
- Refrigerate the cheesecake for at least 4 hours to set properly before serving.
- Serve chilled, optionally topped with additional crushed Oreos or chocolate sauce.
How To Make It – Recipe
Oreo cheesecake is a scrumptious dessert that combines the rich, creamy texture of traditional cheesecake with the iconic flavor of Oreos. This delightful treat is perfect for any occasion, whether it's a birthday celebration, a holiday gathering, or simply a sweet indulgence at home. The best part is that it's surprisingly simple to make, allowing you to impress your friends and family without spending hours in the kitchen.
The combination of a crunchy Oreo crust and a smooth, creamy filling makes this cheesecake a standout dessert. With just a few straightforward ingredients, you can create a luscious cheesecake that highlights the beloved cookie. Follow this recipe to make your own Oreo cheesecake from scratch, and get ready to enjoy a slice of heavenly goodness!
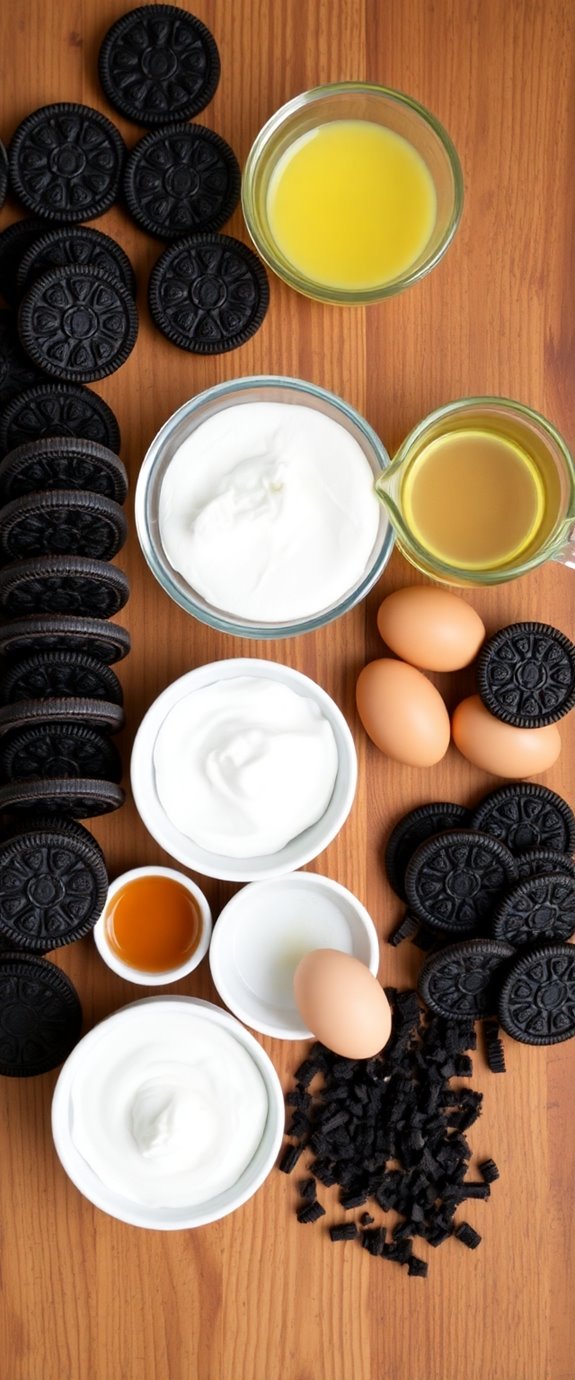
Ingredients:
- 24 Oreo cookies (for crust)
- 1/4 cup unsalted butter, melted
- 16 oz cream cheese, softened
- 1 cup granulated sugar
- 1 teaspoon vanilla extract
- 3 large eggs
- 1 cup sour cream
- 12 Oreo cookies, crushed (for filling)
- Whipped cream (for topping, optional)
- Additional Oreo cookies (for garnish, optional)
To make the Oreo cheesecake, start by preheating your oven to 325°F (160°C). In a food processor, crush the 24 Oreo cookies into fine crumbs. In a mixing bowl, combine the cookie crumbs with the melted butter and mix until well combined. Press the mixture firmly into the bottom of a 9-inch springform pan to create the crust.
In a separate large bowl, beat together the softened cream cheese and sugar until smooth. Add in the vanilla extract, followed by the eggs one at a time, mixing well after each addition. Then, fold in the sour cream and crushed Oreos until evenly distributed. Pour the cheesecake filling over the crust and smooth the top with a spatula.
Bake in the preheated oven for about 50-60 minutes or until the center is set but still slightly jiggly. Once done, turn off the oven and let the cheesecake cool inside for an hour. Afterward, refrigerate for at least 4 hours, or overnight for best results.
When making Oreo cheesecake, be sure to use room temperature cream cheese for a smooth texture and to avoid lumps. If you want to make it even more indulgent, consider adding a drizzle of chocolate sauce or a sprinkle of crushed Oreos on top before serving.
Remember to allow the cheesecake to chill completely before slicing, as this will help it hold its shape and enhance the flavors. Additionally, a no bake Oreo cheesecake is a fantastic alternative for those who prefer a chilled dessert without baking. Enjoy your delicious homemade Oreo cheesecake!
Substitution Suggestions
Wondering how you can customize your Oreo cheesecake to suit different dietary needs or preferences? You can easily swap out regular Oreos for gluten-free Oreo alternatives like gluten-free chocolate sandwich cookies.
If you're looking for a lighter option, try using Greek yogurt or cottage cheese as cream cheese substitutions; they'll still provide a creamy texture.
For vegan options, consider using dairy-free cream cheese and coconut cream.
Sweeteners like maple syrup or agave can replace sugar for a healthier twist. Additionally, using a dairy-free cream cheese can help maintain the cheesecake's rich flavor while meeting dietary restrictions.
With these substitutions, you'll create a delicious cheesecake that everyone can enjoy, no matter their dietary restrictions!
Decorating Ideas
After you've perfected the flavors of your cheesecake with your chosen substitutions, it's time to make it visually stunning.
Start with a smooth layer of whipped cream on top, adding depth to your cheesecake presentation. Sprinkle crushed Oreos generously over the cream for that classic touch.
You can also create a decorative swirl with chocolate sauce or caramel for an eye-catching effect. For a playful twist, consider adding mini Oreos or Oreo toppings around the edges.
Edible glitter or fresh mint leaves can elevate the look, making your cheesecake not just delicious but a true showstopper at any gathering! Additionally, incorporating easy Oreo cheesecake techniques can help showcase your dessert's deliciousness even more effectively.
Serving Suggestions
When you're ready to serve your cheesecake, consider pairing it with a few delightful accompaniments that enhance the overall experience.
A drizzle of chocolate or caramel sauce adds a decadent touch, while fresh berries provide a revitalizing contrast. You can also sprinkle extra Oreo toppings on top for that extra crunch.
If you want to get creative, try cheesecake variations, like adding a layer of peanut butter or mint between the cheesecake and crust. Decadent Oreo Cheesecake Balls are a fun and tasty addition that can complement your dessert spread.
Each option elevates your dessert, making it a showstopper that's sure to impress your guests. Enjoy every bite!
Make-Ahead and Storage
To make your Oreo cheesecake ahead of time, you'll be pleased to know it stores beautifully in the fridge.
For the best results, follow these make ahead tips: assemble your cheesecake and refrigerate it for at least four hours, or overnight for a firmer slice.
When you're ready to store it, use airtight storage containers to keep it fresh.
If you plan to serve it later, consider cutting it into slices before storing. This way, you can easily grab a piece whenever you crave a delicious treat.
Additionally, you can also prepare a no-bake dessert that is just as delightful, making it a versatile option for gatherings.
Enjoy the convenience of prepping in advance while still indulging in a delightful dessert!
How to Store Leftovers
Storing leftovers of your delectable Oreo cheesecake is a breeze, ensuring you can savor every last bite.
To keep your cheesecake fresh, slice it into individual portions and place them in an airtight container. This method not only simplifies serving but also helps in preserving freshness.
If you've got an entire cheesecake left, cover it tightly with plastic wrap or foil before refrigerating. No bake cheesecakes are often best enjoyed chilled, so make sure to refrigerate them promptly after serving.
Make sure to enjoy your leftovers within several days for the best flavor and texture.
Nutrition Facts(per serving)
Indulging in a slice of Oreo cheesecake not only satisfies your sweet tooth but also comes with a set of nutrition facts you might find intriguing.
Each serving typically boasts around 300 calories, making it a delightful treat without overindulging. The ingredient breakdown reveals a mix of cream cheese, whipped topping, and, of course, those iconic Oreo cookies, contributing to its rich flavor.
You'll also find a balance of carbohydrates, fats, and a touch of protein, ensuring you enjoy every bite guilt-free. Additionally, this dessert is often praised for its decadent baked Oreo cheesecake variation, which brings a different texture and flavor profile to the classic no-bake version.
Final Thoughts
As you take a moment to reflect on this delicious Oreo cheesecake recipe, it's clear that this dessert is more than just a sweet treat; it's an experience that brings joy to any occasion.
The rich Oreo flavor envelops your taste buds, while the creamy cheesecake texture melts in your mouth, creating a perfect balance of indulgence.
Whether you're celebrating a special event or simply satisfying a craving, this no-bake cheesecake is a crowd-pleaser.
With minimal effort and maximum flavor, you can impress your friends and family. Additionally, the versatility of Biscoff cheesecake cups offers a delightful twist to traditional cheesecake recipes, making it an exciting option for dessert lovers.
Recipe FAQs
Can I Use Gluten-Free Oreos for This Recipe?
Absolutely, you can use gluten-free Oreos for this recipe! They'll create a delicious crust. If you prefer, there are also vegan Oreo options available that work perfectly, ensuring everyone can enjoy a delightful treat.
How Long Does the Cheesecake Need to Chill?
You'd think cheesecake needs little chilling time, right? For ideal texture, let it chill for at least four hours, but overnight's even better. You'll be rewarded with a creamy dessert that's absolutely worth the wait!
Can I Add Fruit to the Cheesecake?
Absolutely, you can add fruit toppings! Fresh berries or sliced bananas enhance flavor combinations beautifully, adding freshness and a burst of color. Just remember to balance the sweetness of your cheesecake with the fruit's natural tartness.
What Can I Use Instead of Cream Cheese?
If you're seeking a cream cheese alternative, Greek yogurt or mascarpone cheese can work wonders! They'll make your dessert rich and creamy, elevating it to a taste sensation that'll blow your mind! Give it a try!
Is It Possible to Make Mini Cheesecakes?
Absolutely, you can make mini cheesecakes! Using mini cheesecake molds, you can experiment with various flavors like chocolate, strawberry, or lemon. They're perfect for parties and offer a delightful bite-sized treat everyone'll love!