Did you know that you can achieve a perfectly creamy cheesecake without the hassle of a water bath? This method simplifies the process and still results in a delicious dessert that impresses. By following a few simple steps, you can create a rich and smooth cheesecake that rivals any traditional recipe. Curious about how to make it? Let's get started on this delightful journey to cheesecake perfection.
Recipe Tips and Tricks
- Use a springform pan to easily remove the cheesecake without the need for a water bath.
- Preheat the oven to 325°F (163°C) for even baking and better texture.
- Bake the cheesecake for 50-60 minutes until the center is set but slightly jiggly.
- Allow the cheesecake to cool gradually in the oven with the door closed for an hour.
- Refrigerate the cheesecake for at least 4 hours or overnight for optimal slicing and flavor.
How To Make It – Recipe
To make a delicious cheesecake, you'll first want to gather all your ingredients and prepare your baking equipment. A springform pan is the ideal choice for this dessert, as it allows for easy removal once the cheesecake is set. The key to a smooth and creamy cheesecake lies in the mixing process; make certain to beat the cream cheese until it's completely smooth before adding in the other ingredients. This will help to avoid any lumps in your final product.
Next, you'll want to create a flavorful crust that complements the rich filling. Traditional cheesecakes use a graham cracker crust, but feel free to get creative with other types of cookies or even a nut-based crust if you prefer a gluten-free option. Once everything is prepared, be patient during the baking and cooling process, as this will guarantee your cheesecake has the perfect texture and taste.
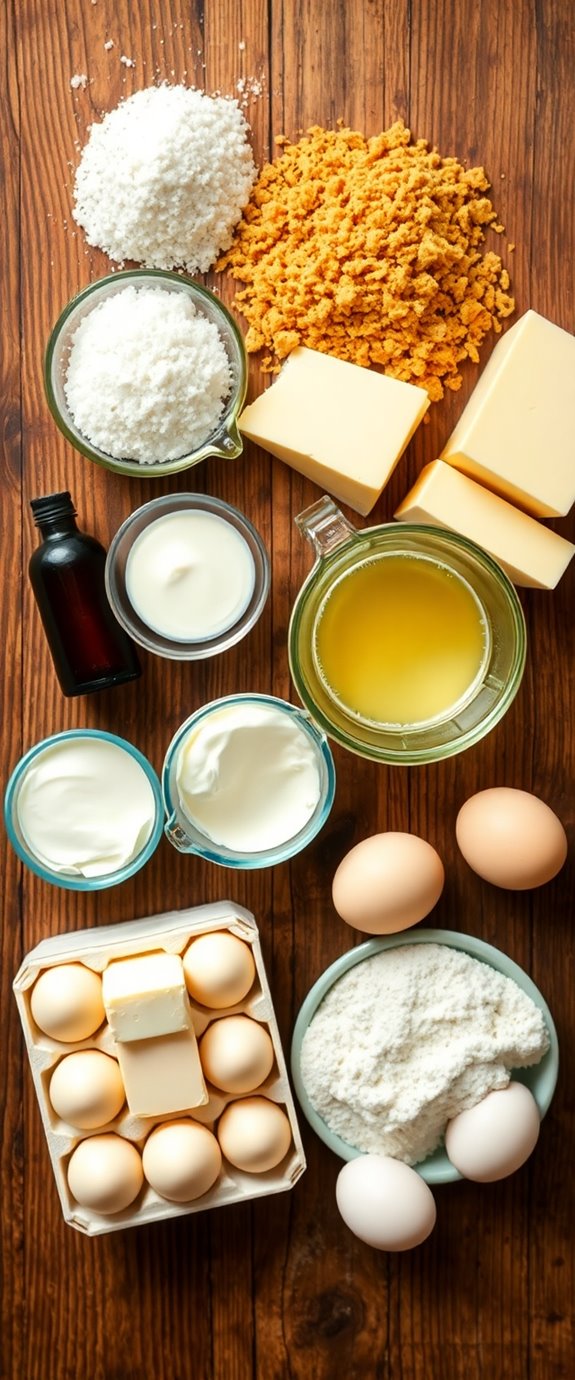
Ingredients:
- 2 cups graham cracker crumbs
- 1/2 cup unsalted butter, melted
- 1/4 cup granulated sugar
- 4 (8 oz) packages cream cheese, softened
- 1 cup granulated sugar
- 1 teaspoon vanilla extract
- 4 large eggs
- 1 cup sour cream
- 1 tablespoon all-purpose flour (optional)
To prepare the cheesecake, preheat your oven to 325°F (163°C). In a mixing bowl, combine the graham cracker crumbs, melted butter, and 1/4 cup of sugar. Press this mixture firmly into the bottom of your springform pan to create an even crust.
In a separate large bowl, beat the softened cream cheese until smooth. Gradually add in the sugar and vanilla extract, mixing until well combined. Add the eggs one at a time, making certain to mix after each addition. Finally, mix in the sour cream and flour if using, until everything is smooth.
Pour the cream cheese mixture over the crust and bake for about 50-60 minutes, or until the center is set and only slightly jiggly. Once baked, turn off the oven and leave the cheesecake inside for an hour before removing it to cool at room temperature, then refrigerate for at least 4 hours or overnight.
For the best results, allow your cheesecake to cool completely before slicing, as this will help it maintain its shape. Consider adding toppings like fresh fruit, chocolate ganache, or a fruit sauce to enhance the flavor and presentation.
Always make certain your cream cheese is at room temperature before mixing; this prevents lumps and promotes a creamy texture. If you're preparing the cheesecake in advance, it can be made up to a few days ahead of time and stored in the refrigerator, making it a perfect option for gatherings or special occasions****.
Substitution Suggestions
If you're looking to customize your cheesecake, there are plenty of substitution options that can enhance or accommodate different tastes and dietary needs.
For flavor substitutions, try using fruit purees, chocolate, or coffee to create unique twists. You can also experiment with extracts like almond or coconut for added depth.
When it comes to ingredient alternatives, consider swapping cream cheese for Greek yogurt or silken tofu for a lighter, dairy-free option. Using Greek yogurt not only provides a creamy texture but also adds a tangy flavor that elevates the overall taste.
If you need a gluten-free crust, crushed nuts or gluten-free cookies work wonderfully.
These adjustments let you create a cheesecake that's truly your own!
Decorating Ideas
After perfecting your cheesecake and making those personalized substitutions, it's time to make it visually stunning.
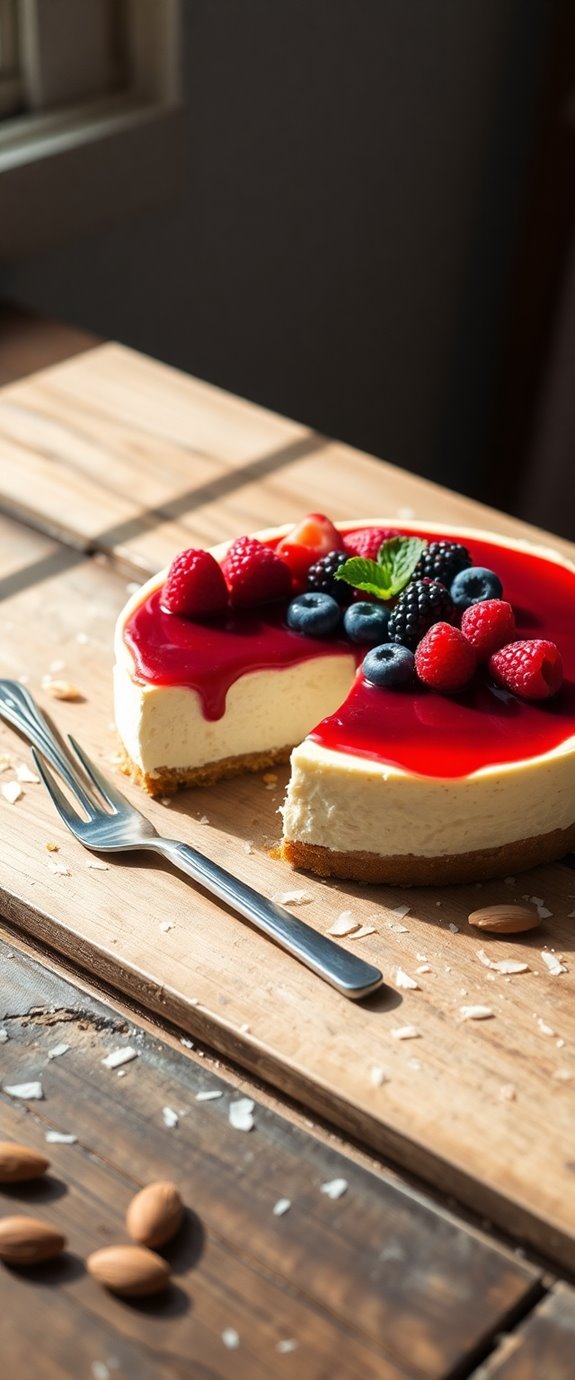
Start by layering your cheesecake with delightful cheesecake toppings like fresh berries, chocolate ganache, or a drizzle of caramel. Consider adding a sprinkle of crushed nuts for a crunchy texture.
For decorative garnishes, use mint leaves or edible flowers to elevate the presentation. You can also pipe whipped cream around the edges for a touch of elegance. A classic choice for toppings is Deliciously Creamy Strawberry Cheesecake, which adds a vibrant color and flavor.
Remember, the key is to balance flavors and colors, creating an inviting dessert that's as pleasing to the eye as it's to the palate.
Enjoy decorating!
Serving Suggestions
While you might be enthusiastic to dig into your cheesecake right away, taking a moment to think about how to serve it can enhance the experience.
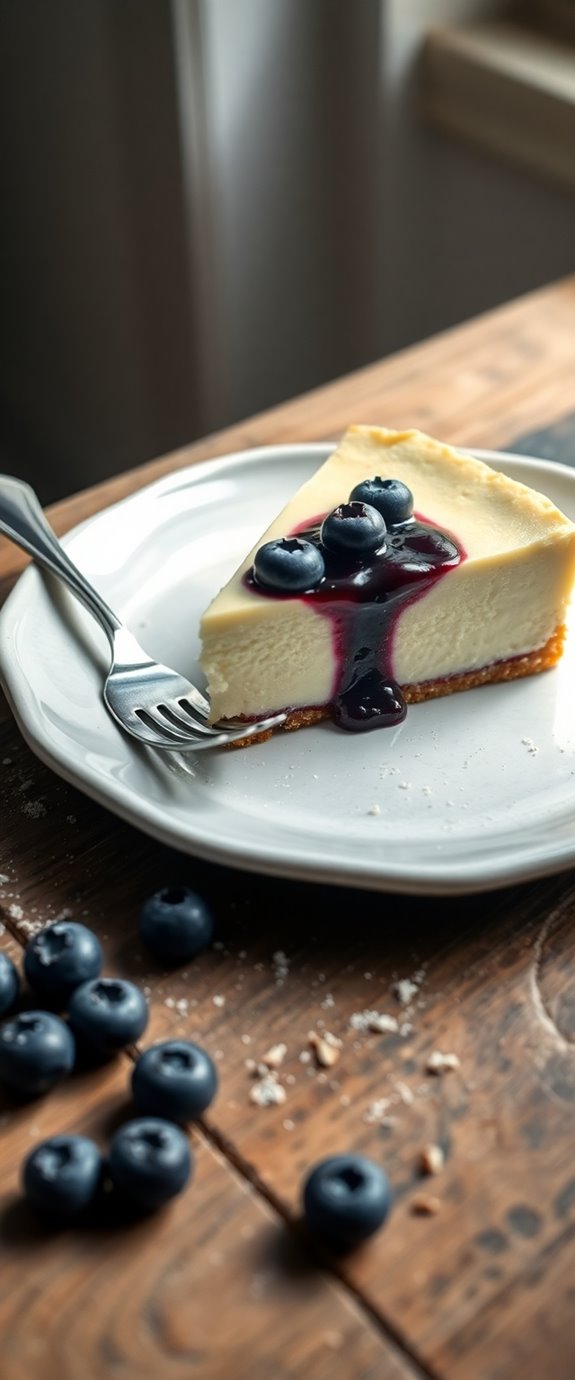
Consider drizzling rich chocolate or caramel sauce over the top for a decadent finish. Fresh fruit, like berries or sliced peaches, adds an invigorating contrast and vibrant color.
For a nutty crunch, sprinkle crushed nuts or toffee bits as cheesecake toppings. Don't forget about flavor pairings—citrus zest or a hint of vanilla can elevate your dessert. Additionally, serving with Deliciously Creamy Strawberry Cheesecake can offer a delightful variation that'll impress your guests and make every bite unforgettable!
Make-Ahead and Storage
When you're planning a gathering or simply want to indulge in cheesecake over several days, making it ahead of time is a fantastic option.
You can easily freeze cheesecake for later enjoyment; just wrap individual slices tightly in plastic wrap and then aluminum foil, ensuring no air gets in.
For thawing methods, place your cheesecake in the fridge overnight for a gentle defrost, or if you're in a hurry, leave it at room temperature for about an hour.
To enhance its flavor, consider adding delicious toppings like fruit or chocolate before serving.
Once thawed, your cheesecake will taste just as fresh as when you made it, ready to impress your guests or satisfy your cravings!
How to Store Leftovers
To keep your leftover cheesecake tasting fresh and delicious, proper storage is key.
First, let it cool completely before covering it with plastic wrap or transferring it to an airtight container.
For refrigeration, place it in the fridge, where it'll stay good for up to several days. Additionally, no-bake cheesecakes are known for their creamy texture, making them a great option for leftovers.
If you need longer storage, consider freezing methods. Slice the cheesecake and wrap each piece tightly in plastic wrap before placing them in a freezer-safe bag.
This way, you can enjoy a slice anytime! Just thaw in the fridge overnight when you're ready to indulge again.
Happy storing!
Nutrition Facts(per serving)
Indulging in a slice of cheesecake not only satisfies your sweet tooth but also comes with its own set of nutrition facts that you might find intriguing.
A typical serving packs around 300-400 calories, depending on the recipe's ingredient breakdown. You'll notice a combination of cream cheese, sugar, and eggs, contributing to its rich flavor and texture.
Each slice offers protein and fats, essential for energy, but be mindful of those sugars! Knowing the caloric content helps you enjoy your dessert while keeping your dietary goals in check. Additionally, the classic New York cheesecake is known for its dense and creamy texture, which is a hallmark of its irresistible appeal.
Final Thoughts
As you reflect on the delightful experience of enjoying cheesecake, it's clear that this dessert is more than just a treat; it's a celebration of flavors and textures.
With endless taste variations, from rich chocolate to zesty lemon, each bite brings joy. Cheesecake's creamy consistency pairs beautifully with events, whether it's a cozy family gathering or an elegant dinner party.
You can easily customize your cheesecake to match the occasion, making it a versatile choice for any celebration. Additionally, preparing a no-bake cheesecake allows you to enjoy this indulgent dessert without the hassle of baking.
Recipe FAQs
Can I Use a Different Crust for My Cheesecake?
Absolutely, you can use alternative crusts for your cheesecake! Consider graham cracker, Oreo, or even nut-based crusts. Experimenting with different flavors can elevate your dessert, creating delightful combinations that surprise and satisfy your taste buds.
How Do I Know When the Cheesecake Is Fully Cooked?
Like a treasure chest waiting to be opened, your cheesecake reveals its secrets through a doneness test. After the baking time, gently jiggle the pan; if it's set around the edges, you're golden!
Can I Freeze the Cheesecake After Baking?
Yes, you can freeze the cheesecake after baking! For the best results, wrap it tightly in plastic wrap, but be aware that freezing may cause slight texture changes. Follow these freezing tips for a delicious treat later!
What Can I Do if My Cheesecake Cracks?
If your cheesecake cracks, don't worry! You can cover it with a delicious fruit topping. For cheesecake storage, make certain it's airtight in the fridge. Fixing cracks can be simple and make your dessert look fabulous!
Is There a Dairy-Free Option for This Cheesecake Recipe?
Where there's a will, there's a way. You can easily swap cream cheese for dairy alternatives like cashew cream or tofu. Use vegan substitutes like coconut cream to maintain that rich, creamy cheesecake experience without dairy.