
If you're looking for a unique dessert that combines rich chocolate and invigorating mint, mint cake pops could be just what you need. They're not only fun to make, but they're also perfect for sharing at any celebration. You'll start by baking a mint chocolate cake, then crumble it and mix it with mint frosting. The process is simple, but the results are impressive. Curious about the next steps and how to customize these treats?
Recipe Tips and Tricks
- Use 1 box of mint chocolate cake mix and 1 cup of mint frosting for the cake pops base.
- Crumble the cooled cake and mix with frosting until moldable, then roll into balls.
- Insert lollipop sticks and freeze for 30 minutes before dipping in melted chocolate.
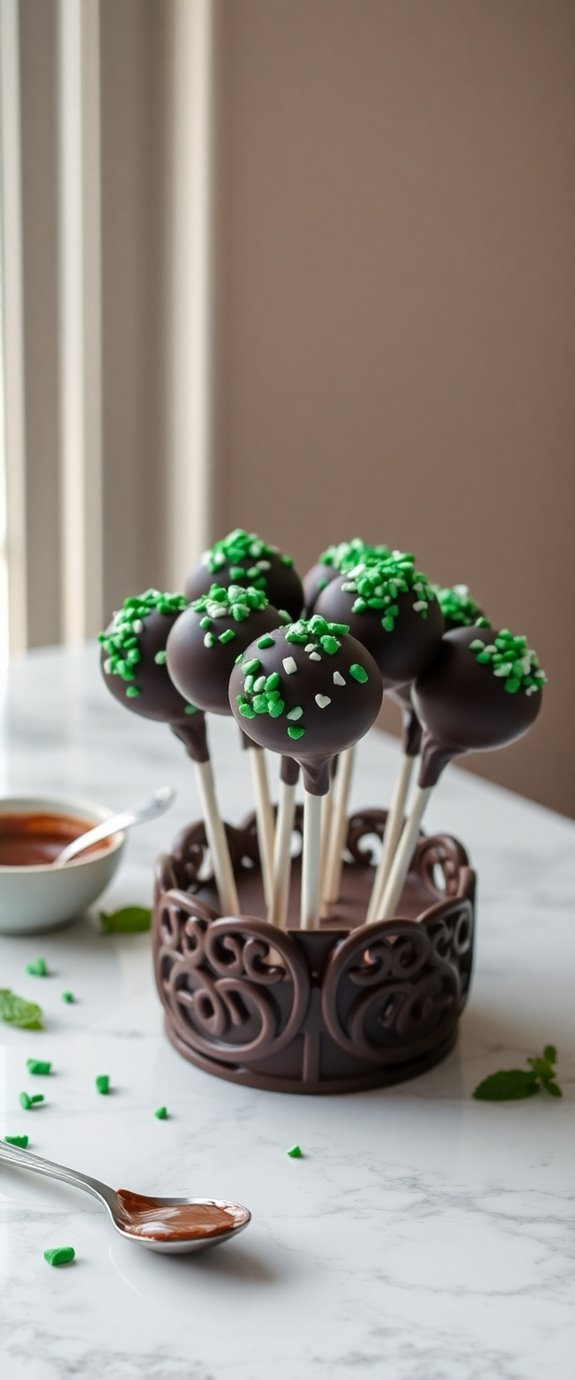
- Customize with sprinkles or crushed peppermint candies for added decoration and flavor.
- Store in an airtight container in the fridge for up to a week or freeze for longer storage.
How To Make It – Recipe

Mint cake pops are a delightful treat that combines the rich flavor of chocolate with the invigorating taste of mint, creating a perfect dessert for any occasion. These fun and festive bites aren't only delicious but also visually appealing, making them a hit at parties or gatherings.
With their vibrant colors and delightful crunch, mint cake pops are sure to impress your guests and satisfy your sweet tooth. Making mint cake pops is an enjoyable activity for both kids and adults alike. The process involves baking a mint-flavored cake, crumbling it, mixing it with frosting, and shaping it into pops. Once the cake pops are formed, they're dipped in melted chocolate and decorated as desired.
This recipe is simple to follow and can easily be modified to suit your taste preferences by adding different toppings or flavorings. A gluten-free option is also available to accommodate various dietary needs.
Ingredients:
- 1 box of mint chocolate cake mix
- 1 cup of mint frosting
- 12 oz of chocolate candy melts (dark, milk, or white)
- Lollipop sticks
- Sprinkles (optional)
- Crushed peppermint candies (optional)
Instructions:
Start by preparing the mint chocolate cake according to the package instructions. Once baked, allow it to cool completely, then crumble the cake into a large mixing bowl.
Gradually add the mint frosting to the crumbled cake, mixing until the mixture holds together and is moldable. Scoop out small portions and roll them into balls, then insert a lollipop stick into each ball and place them on a baking sheet lined with parchment paper.
Freeze the cake pops for about 30 minutes to help them firm up. Meanwhile, melt the chocolate candy melts according to the package instructions.
Once the cake pops are firm, dip each one into the melted chocolate, allowing any excess to drip off, and then place them back on the parchment paper to set. If desired, sprinkle with crushed peppermint candies or sprinkles before the chocolate hardens.
Extra Tips:
To make your mint cake pops even more delicious, consider adding a few drops of peppermint extract to the frosting for an extra burst of flavor.
Additionally, if you want to create a variety of designs, you can use different types of chocolate melts or food coloring to customize the appearance of your cake pops.
Remember to work quickly when decorating, as the chocolate can set fast. Finally, store any leftover cake pops in an airtight container in the refrigerator for up to a week, allowing you to enjoy these tasty treats long after they're made!
Substitution Suggestions
If you're looking to customize your mint cake pops or adapt the recipe to fit your dietary needs, there are plenty of substitution options available.
For a different twist, try using peppermint extract or spearmint oil as mint flavor alternatives.
If you need gluten free options, substitute regular cake mix with a gluten free variety; just verify any additional ingredients are also gluten free.
You can also replace traditional frosting with a gluten free alternative or even a dairy-free option to suit your needs.
These changes will help you create delicious treats that cater to your preferences without sacrificing flavor! Additionally, consider incorporating almond flour into your cake mix for added moisture and a nutty flavor.
Decorating Ideas
Transforming your cake pops into eye-catching treats is easier than you might think. Start by dipping each cake pop in green candy melts for a vibrant minty base.
For a festive touch, sprinkle crushed peppermint candies or edible glitter on top. You can also drizzle white chocolate for a striking contrast.
Consider using mini marshmallows as accents, shaping them into festive themes like snowmen or Christmas trees. Finally, add mint decorations like chocolate leaves or small mint candies to enhance the flavor and appearance. A great way to elevate the taste is by incorporating decadent chocolate into the cake mixture itself.
With these simple ideas, your mint cake pops will be a delightful centerpiece at any celebration!
Serving Suggestions
While planning a party or gathering, serving your cake pops on a decorative stand can elevate their appeal.
Opt for a tiered stand to showcase those vibrant mint pops, drawing guests in. For a touch of whimsy, arrange them on creative platters adorned with fresh mint leaves or sprinkles.
You might even consider using colored paper liners for an extra pop of color. These visual elements not only enhance your table setting but also make your treats the star of any festive occasion. Additionally, incorporating seasonal fruits like strawberries can provide a delightful Japanese Strawberry Cake inspiration that complements the mint flavor beautifully.
Make-Ahead and Storage
To guarantee your mint cake pops are ready when you need them, it's a great idea to make them ahead of time. You can prepare the cake pops a day or two in advance, allowing the flavors to meld beautifully. Once they're coated and decorated, place them on a baking sheet lined with parchment paper. For storage, cover them loosely with plastic wrap and refrigerate. This keeps them fresh and prevents sticking. If you're making them even earlier, consider freezing them. Just remember to thaw before serving! These storage tips assure your cake pops are delicious and ready for any occasion. Additionally, using decadent mint Oreo cake as a base can elevate the flavor profile of your cake pops.
How to Store Leftovers
After enjoying your delicious mint cake pops, you'll want to make sure those leftovers stay fresh and tasty.
For ideal leftover storage, place them in an airtight container, which prevents moisture and odors from spoiling your treats. If you've used chocolate or candy melts, consider separating layers with parchment paper to avoid sticking.
Refrigeration tips include keeping the pops in the fridge for up to a week, but they're best enjoyed within three days. If you need to store them longer, freeze them wrapped individually in plastic wrap, then place them in a freezer-safe bag for up to a month.
Nutrition Facts(per serving)
When you indulge in a mint cake pop, you're treating yourself to a delightful blend of flavors and textures. Each serving packs around 150 calories, making it a sweet yet manageable treat.
The ingredient breakdown reveals a mix of cake, frosting, and chocolate coating, each contributing to its overall flavor. You'll find sugar, flour, and mint extract harmonizing beautifully, while the chocolate adds a rich depth. Additionally, the combination of cream cheese in certain cake recipes can enhance the moistness and richness of the cake pops.
Keep in mind that while these pops offer a moment of joy, moderation is key. Enjoy your mint cake pop, knowing you're savoring a little piece of deliciousness with every bite!
Final Thoughts
As you reflect on the joy of making mint cake pops, it's clear that these delightful treats bring a burst of flavor and creativity to any gathering.
Whether you're catering to specific taste preferences or experimenting with seasonal variations, these pops are versatile and fun. You can easily adjust the mint flavor or add festive sprinkles to match the occasion.
Don't hesitate to get creative with colors and toppings—think red and green for the holidays or pastel shades for spring.
Ultimately, making these cake pops isn't just about the taste; it's about sharing joy and deliciousness with friends and family. Enjoy! Additionally, consider pairing them with a rich decadent chocolate mint ice cream cake for an unforgettable dessert experience.
Recipe FAQs
Can I Use Different Types of Chocolate for Coating?
Absolutely, you can use different types of chocolate for coating! White chocolate adds sweetness, while dark chocolate gives a rich, bold flavor. Experimenting with both can create a delightful contrast that enhances your treat's taste and appearance.
How Long Do Mint Cake Pops Last at Room Temperature?
Mint cake pops typically last about two to three days at room temperature. For ideal shelf life, store them in a cool, dry place, away from direct sunlight. Enjoy them while fresh for the best taste!
Are There Vegan Options for This Recipe?
Yes, there are vegan options! You can use plant-based alternatives like almond milk, coconut cream, and dairy-free chocolate. For binding, consider using mashed bananas or applesauce as vegan substitutes to keep your treats deliciously moist.
Can I Freeze Mint Cake Pops Before Decorating?
Freezing mint cake pops before decorating can be a game-changer. Just remember, proper freezing tips guarantee they stay fresh, while creative decorating techniques bring them to life. So, chill them first, then let your imagination soar!
What Other Flavors Pair Well With Mint in Cake Pops?
If you're exploring flavor pairings with mint, consider rich chocolate, invigorating fruit flavors like raspberry, zesty herbal accents, or even nutty additions like almond. Each combination creates a delightful twist that's sure to impress!


