Have you ever wondered if a simple box of brownie mix can transform into something extraordinary? The truth is, by adding crushed Oreos, you can elevate your brownies to a whole new level of deliciousness. With just a few additional ingredients and minimal effort, you can impress your family and friends. Curious about how to create this indulgent treat? Let's explore the steps to whip up these Easy Oreo Brownies.
Recipe Tips and Tricks
- Combine a box of brownie mix with crushed Oreo cookies for a quick and delicious treat.
- Follow package instructions for brownie mix, adding crushed Oreos and optional chocolate chips or nuts.
- Bake at 350°F (175°C) for 20-25 minutes until moist crumbs appear on a toothpick.
- Customize by using different sandwich cookies or gluten-free flour alternatives as desired.
- Serve warm with ice cream or whipped cream, and garnish with crushed Oreos for extra flavor.
How To Make It – Recipe
To make Easy Oreo Brownies, start by gathering all your ingredients to guarantee a smooth cooking experience. This delightful dessert combines the rich, fudgy texture of brownies with the classic taste of Oreos, making it a favorite for both kids and adults alike. Decadent Oreo Brownies can be a great addition to any dessert table, elevating your sweet offerings.
Whether it's for a family gathering, a birthday party, or just a sweet treat at home, these brownies are sure to impress.
Preheat your oven to 350°F (175°C) and prepare a baking pan by lining it with parchment paper or greasing it lightly. This will help to prevent the brownies from sticking and will make for easier cleanup. The combination of chocolate and Oreo cookies creates an indulgent dessert that's both easy to prepare and absolutely delicious.
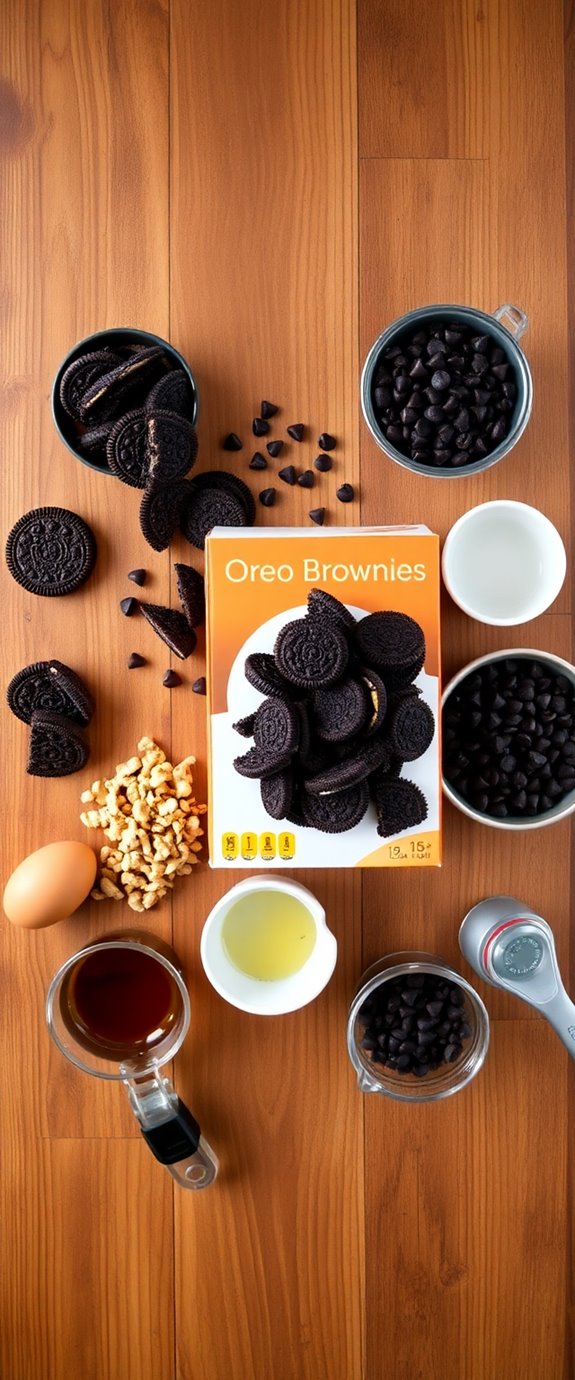
Ingredients:
- 1 box of brownie mix (plus ingredients required on the box, usually eggs, oil, and water)
- 15 Oreo cookies, crushed
- 1 cup chocolate chips (optional)
- 1/2 cup of chopped nuts (optional)
In a large mixing bowl, prepare the brownie mix according to the package instructions, incorporating the eggs, oil, and water as indicated. Once mixed, fold in the crushed Oreo cookies and, if desired, the chocolate chips and chopped nuts.
Pour the batter into the prepared baking pan, spreading it evenly. Bake in the preheated oven for about 20-25 minutes, or until a toothpick inserted in the center comes out with moist crumbs.
Allow the brownies to cool in the pan for a few minutes before transferring them to a wire rack to cool completely. For the best results, let the brownies sit for a bit longer after baking to allow them to set properly, as they'll continue to firm up as they cool.
Feel free to experiment by adding different toppings like whipped cream or a drizzle of chocolate syrup for extra sweetness. If you're looking for a more decadent dessert, serve them warm with a scoop of vanilla ice cream on top.
Enjoy your delicious Easy Oreo Brownies!
Substitution Suggestions
If you're looking to customize your Easy Oreo Brownies, there are plenty of substitution options that can elevate this dessert to new heights.
For a twist, try using Oreo alternatives like chocolate sandwich cookies or even peanut butter-filled cookies for a unique flavor.
If you need gluten-free options, substitute regular flour with almond or coconut flour, and use gluten-free sandwich cookies.
You can also replace the butter with coconut oil for a dairy-free version.
These substitutions not only maintain the deliciousness but also cater to various dietary needs, ensuring everyone can enjoy your scrumptious brownies.
For a truly indulgent experience, consider adding decadent peanut butter to the brownie batter for an extra layer of flavor.
Happy baking!
Decorating Ideas
After whipping up a batch of those delicious Easy Oreo Brownies, you might want to take them to the next level with some creative decorating ideas.
Consider adding Oreo toppings like crushed cookies or mini Oreos for extra crunch and flavor. Drizzle melted chocolate or white chocolate over the top for a decadent touch.
For brownie variations, try layering in caramel or peanut butter swirls before baking. If you're feeling adventurous, sprinkle colorful sprinkles or edible glitter for a festive look. You can also incorporate decadent brownie flavors such as mint or raspberry to elevate the taste.
With these simple enhancements, your brownies won't only taste amazing but also look stunning!
Serving Suggestions
Everyone loves a warm, fudgy brownie, especially when it's packed with Oreo goodness.
To elevate your dessert, consider drizzling chocolate or caramel sauce over the top, enhancing those delightful Oreo toppings.
Pair your brownies with a scoop of vanilla ice cream for a classic treat, or try a dollop of whipped cream sprinkled with crushed Oreos for added texture.
For a fun twist, serve mini brownies alongside a shot of espresso or cold milk, creating a delectable dessert pairing that delights the senses.
Additionally, you can make these brownies even more indulgent by incorporating decadent Air Fryer techniques to achieve a perfectly gooey center.
You'll impress your guests while satisfying every chocolate lover's craving with these simple serving suggestions!
Make-Ahead and Storage
To keep those tasty Oreo brownies ready for any occasion, you can easily make them ahead of time and store them properly.
First, bake the brownies and let them cool completely. For make-ahead tips, slice them into squares before storing; this makes it easier to grab a treat later.
Use airtight storage containers to maintain freshness, and place parchment paper between layers to prevent sticking. You can refrigerate them for up to a week or freeze for longer storage. Decadent Chocolate Chip Oreo Brownies are a perfect choice for those who love a rich dessert.
Just remember to thaw them in the fridge before enjoying your delicious brownies again!
How to Store Leftovers
While you might be tempted to leave those delicious Oreo brownies out on the counter, storing leftovers properly guarantees they stay fresh and tasty for longer.
To keep them at their best, wrap each brownie in plastic wrap or place them in an airtight container. Storing tips include keeping them in a cool, dry place away from direct sunlight.
If you want to enjoy them later, consider freezing options. Simply freeze individual brownies in a freezer-safe bag or container, making sure to label the date. The Oreo fudge brownies can last up to three months in the freezer.
When you're ready, thaw them at room temperature for a delightful treat!
Nutrition Facts(per serving)
When you're indulging in a rich, fudgy Oreo brownie, it's important to know what you're treating yourself to. Each serving typically packs around 200 calories, making it a delightful yet decadent choice.
The ingredient breakdown reveals a blend of chocolate, sugar, butter, and, of course, those irresistible Oreo cookies. These components contribute not just to the caloric content but also to the mouthwatering flavor and texture.
With a perfect balance of sweetness and creaminess, these brownies are a true treat. Just remember, moderation is key, so savor each bite without guilt while keeping an eye on those nutrition facts! Additionally, these brownies are eggless treats that cater to various dietary preferences, making them even more enjoyable for everyone.
Final Thoughts
As you take a moment to reflect on your baking adventure, it's clear that these Easy Oreo Brownies are more than just a dessert; they're a delightful fusion of flavors that brings joy to any occasion.
With a few baking tips, like ensuring your ingredients are at room temperature and not overmixing the batter, you'll achieve that perfect texture.
Don't hesitate to explore flavor variations, such as adding peanut butter or mint extract, to personalize your brownies.
One delightful option to consider is incorporating Oreo cookie crumbs into the brownie batter for an extra layer of flavor and texture.
Whether it's a family gathering or a cozy night in, these brownies are sure to impress and satisfy every chocolate lover's cravings!
Recipe FAQs
Can I Use Gluten-Free Oreos for This Recipe?
Yes, you can definitely use gluten-free Oreos for this recipe! They're great Oreo alternatives, making gluten-free baking both delicious and satisfying. Just make sure they're fresh for the best flavor and texture in your dessert!
How Long Do These Brownies Take to Bake?
When you're baking these brownies, imagine a chocolate eruption in your oven! At 350°F, your baking time is around 25-30 minutes. Keep an eye out for the toothpick test for perfect fudginess!
Can I Add Nuts to the Brownie Mixture?
Absolutely, you can add nuts to the brownie mixture! Consider nut varieties like walnuts or pecans for delightful flavor combinations. They'll add a crunchy texture and enhance the overall taste, making your brownies even more irresistible.
What Size Pan Should I Use for Baking?
You might think any pan works, but choosing the right baking pan size is essential. Opt for an 8×8 or 9×9 inch square pan for perfect brownie pan options, ensuring they bake evenly and deliciously.
Can I Freeze These Brownies for Later?
Yes, you can freeze brownies for later! Just wrap them tightly in plastic wrap and foil. They'll stay fresh for up to three months. For best results, thaw in the fridge before enjoying those delicious treats!